Grand Piano Template Instructions
Steps to Create the Template:
You must place an order and select custom made. An email will be sent with the address of the warehouse to mail your template to.
-
Materials:
-
Brown paper or newspaper
-
Scotch tape
-
Measuring tape
-
Pencil or marker
-
-
Preparation:
-
Clear the area around the piano to give yourself space.
-
Ensure the piano lid is closed securely.
-
Cut a large piece of brown paper or newspaper that will cover the entire lid. You may need to use multiple pieces of paper, depending on the size of the lid.
-
-
Placement:
-
Lay the paper across the closed piano lid. Use scotch tape to secure the edges of the paper, making sure it’s held firmly in place without wrinkles or shifts.
-
-
Marking the Pattern:
-
Once the paper is securely taped, use a pencil or marker to trace around the extreme outer edges of the closed lid of the grand piano. This will give you the basic outline of the piano lid.
-
Make sure the paper is fully stretched and evenly placed so your tracing is accurate.
-
-
Cutting the Pattern:
-
After you’ve traced the shape of the lid, carefully cut around the entire traced line using scissors or a utility knife.
-
You now have a template that corresponds to the lid of the piano.
-
-
Measurements:
-
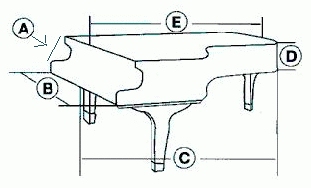
We require 5 measurements, see diagram below.
-
-
Labeling:
-
Write the Piano Manufacturer’s Name (e.g., Steinway, Yamaha, etc.) and the piano size (e.g., 7' grand, 6'3" grand) clearly on the paper.
-
Make sure the text is legible and placed in a spot where it won't be cut off when the template is used.
-


